Truly fine
Documentation.
Setting up product tables
Last update:
This feature was introduced in version 6.2.0
Displaying tabular data is an issue that many merchants face, yet Shopify doesn’t provide a built-in way to handle them. Athens offers a elegant solution that hopefully solves most common use-cases that involve tables.
The solution is centered around a metaobject that allows for groups of one or more rows (configurable). Respectively, each metaobject entry holds the values for one or more rows, as a logical group. Then, a product-bound metafield allows you to select groups of rows to display, effectively building a configurable table.
Set up the metaobject
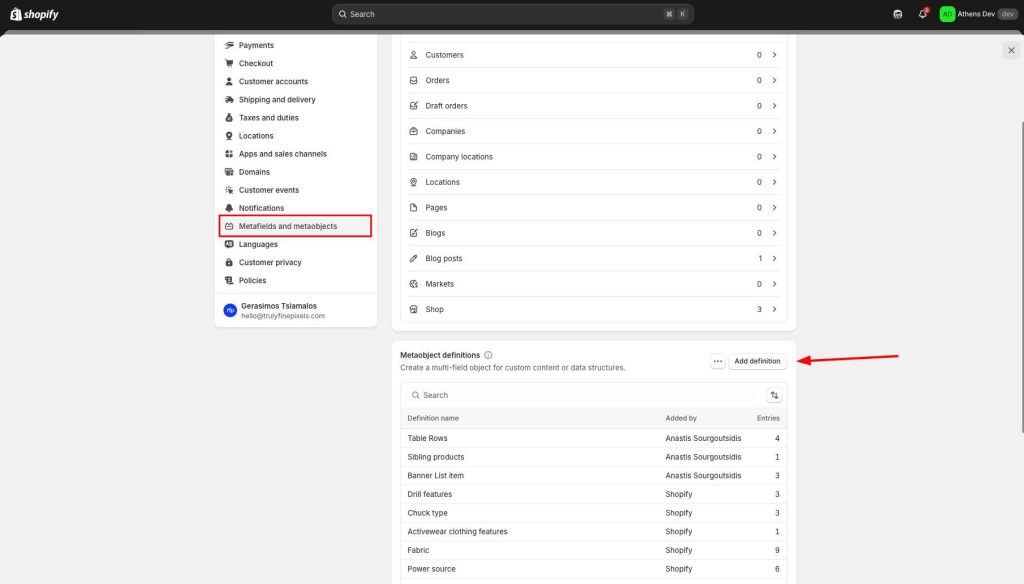
To create the metaobject definition, first go to Settings > Metafields and metaobjects, scroll down to the Metaobject definitions section and click on the Add definition button.
On the Name field, type a descriptive name, such as “Table rows“. We will refer back to it when we set up the product metafield.
Add a title field
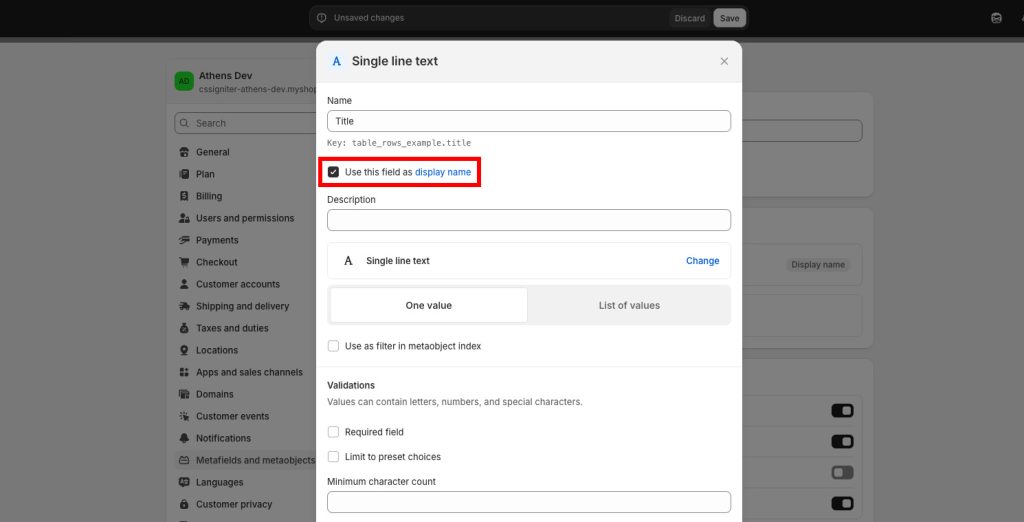
Click on the Add field link, and from the list of field types, select Single line text. On the Name field, type a descriptive name, such as “Title“. This is for your own reference. Make sure the Use this field as display name checkbox is checked. Press the Add button on the bottom right corner.
Add a row field
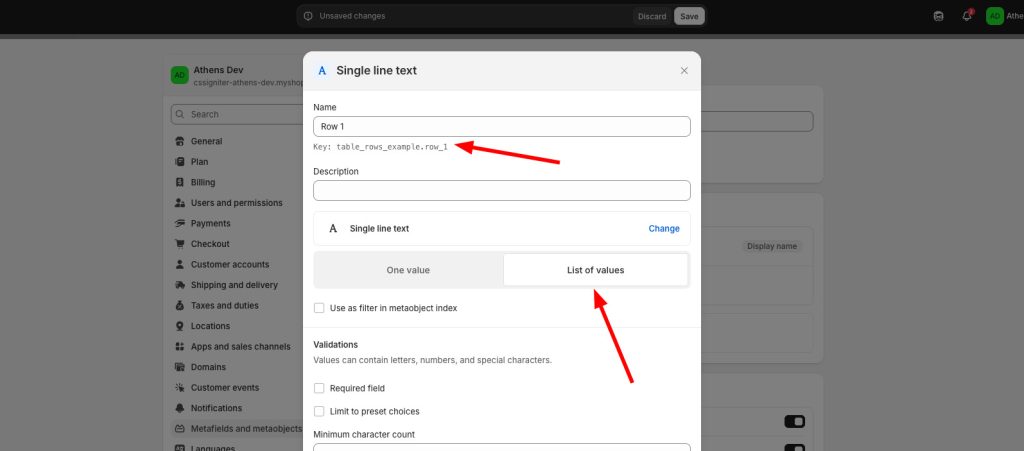
Click on the Add field link, and from the list of field types, select Single line text. On the Name field, type “Row 1“. Make sure the last part of the key is “row_1“. If it’s not, click on the key to edit it, and change it to “row_1“. Select “List of values“, and press the Add button on the bottom right corner.
You can repeat this process to add more rows now, or come back later if needed. For the sake of this guide, let’s add two more rows.
Click on the Add field link, and from the list of field types, select Single line text. On the Name field, type “Row 2“. Make sure the last part of the key is “row_2“. If it’s not, click on the key to edit it, and change it to “row_2“. Select “List of values“, and press the Add button on the bottom right corner.
Repeat the same for Row 3.
Important: The field keys MUST be named like row_1, row_2, row_3, etc. and be numbered sequentially.
Once you have the title and row fields set up, press Save to save the metaobject definition.
Set up the product metafield
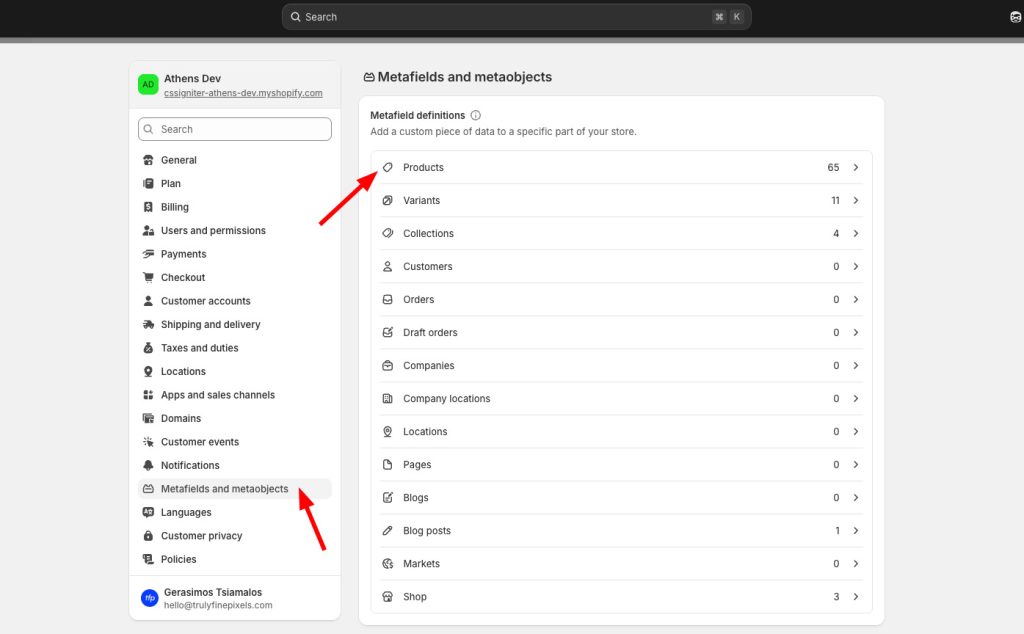
To create the product (or variant) metafield, go to Settings > Metafields and metaobjects, and on the Metafield definitions section click on Products. Then, click on the Add definition button.
On the Name field, type a descriptive name, such as “Compatible cars“. The name should reflect what the table is about, so avoid generic names such as “Table” or “Data rows”. Make note of the resulting namespace and key, e.g. “custom.compatible_cars“.
Click on Select type, and select Metaobject. On the Reference dropdown, select “Table rows” (or whichever name you gave to the metaobject definition earlier). Then, select List of entries.
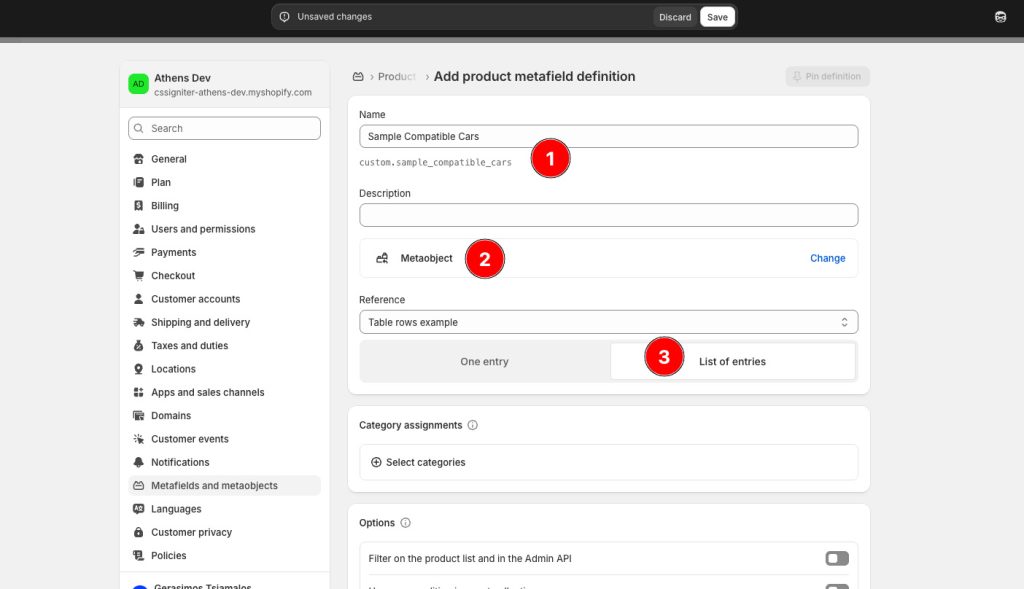
Finally, press Save to persist the metafield.
Add a heading row
The table in our example, will have three columns for “compatible cars”, as the name suggests: Make, Model, and Year.
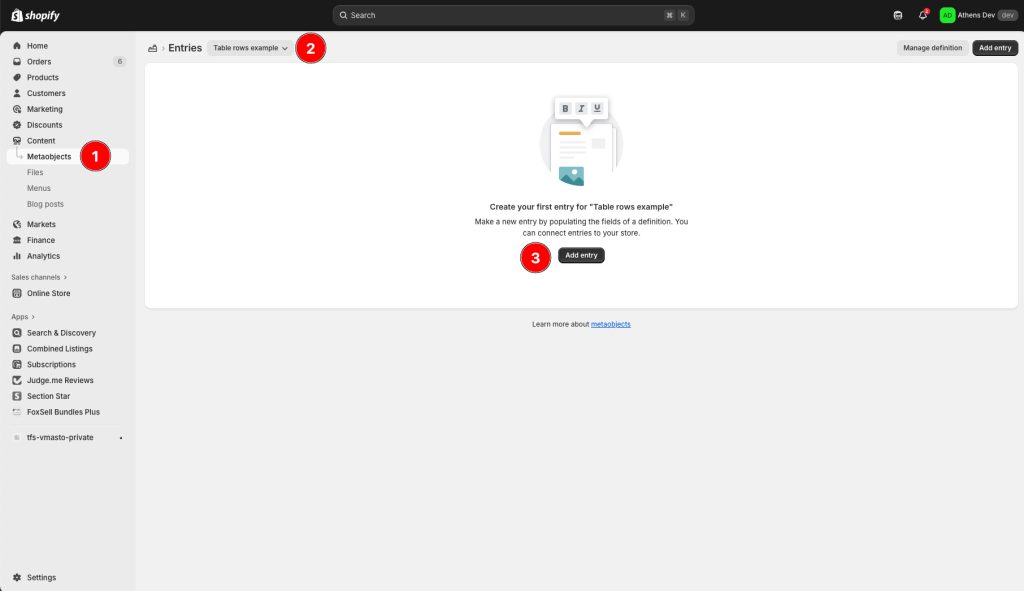
Let’s go ahead and add an entry for the headings. Head to Content > Metaobjects, and select Table rows (or whichever name you gave to the metaobject definition earlier). Then, press the Add entry button.
On the Title field type something descriptive, such as “Car compatibility headings“. This is for your own reference, and will help you locate the entry later.
Click on Row 1 and type “Make“. Click on the Add item button and type “Model“. Click again on the Add item button and type “Year“. Every new item you add, will effectively be another column on the table.
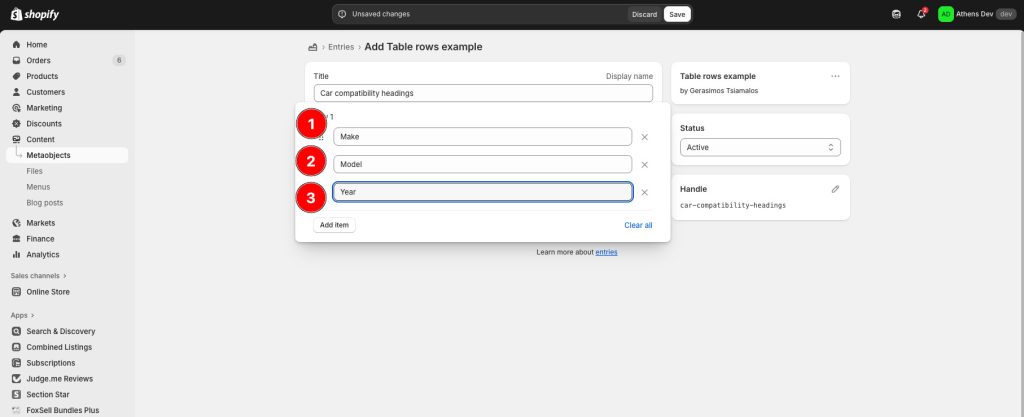
That’s it for the headings. You don’t need to enter something in Row 2 and Row 3. Click Save to save your changes.
Add table rows
Let’s add some car models! Again, go to Content > Metaobjects > Table rows > Add entry.
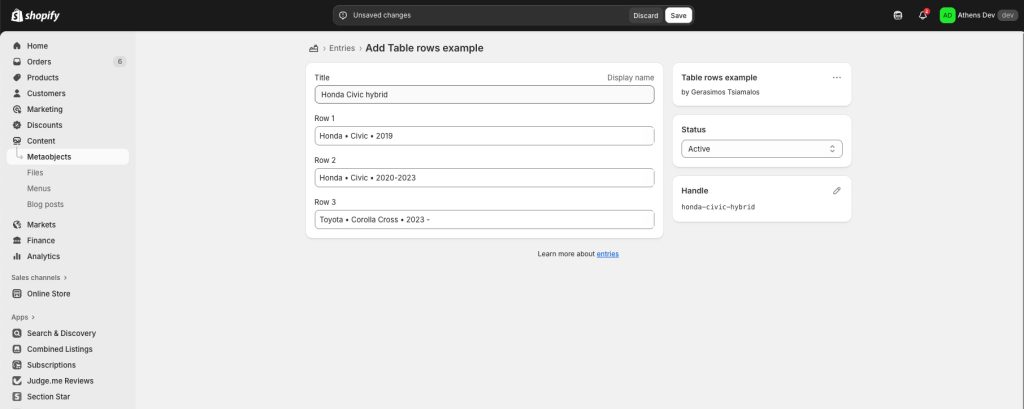
For the title write something descriptive, like “Honda Civic hybrid“. Click on Row 1 and type “Honda“. Click on the Add item button and type “Civic“. Click again on the Add item button and type “2019“.
Do the same on Row 2 but with values “Honda“, “Civic“, “2020 – 2023“. Repeat on Row 3 if needed.
Add another Table rows entry, with title “Toyota Corolla Cross“. Add a row with values “Toyota“, “Corolla Cross“, “2023 – “.
Choose table rows for product
Now that we have a few entries, let’s go ahead and select some of them to build the car compatibility table for a specific product.
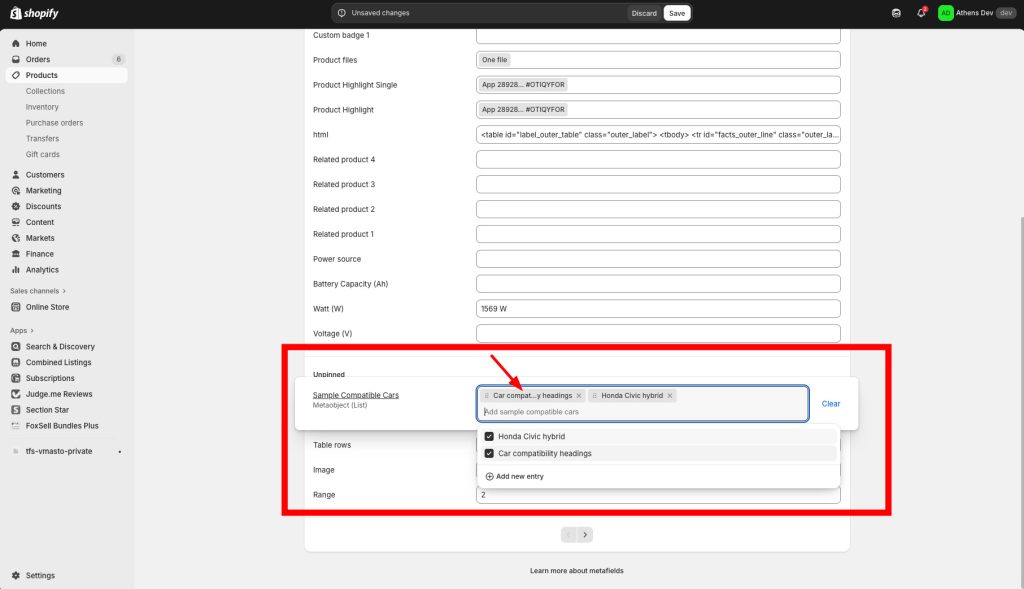
Edit the required product, and scroll down to the Product metafields section. Click on the Compatible cars field (or whichever name you gave to the product metafield earlier), and click to select a few of the available entries. Make sure to select the Car compatibility headings entry, and if needed drag-and-drop it to be the first item. Save your changes.
Display the table
We are ready to display our table. Go to the theme customization page (Sales channels > Online Store > Themes > Customize) and customize the default Product template. Make sure you are previewing the same product you added the table to.
On the Product information section, add the Table block. On the Table rows metafield field, type/paste the namespace and key of your product metafield that you noted earlier, which in our example is “custom.compatible_cars“.
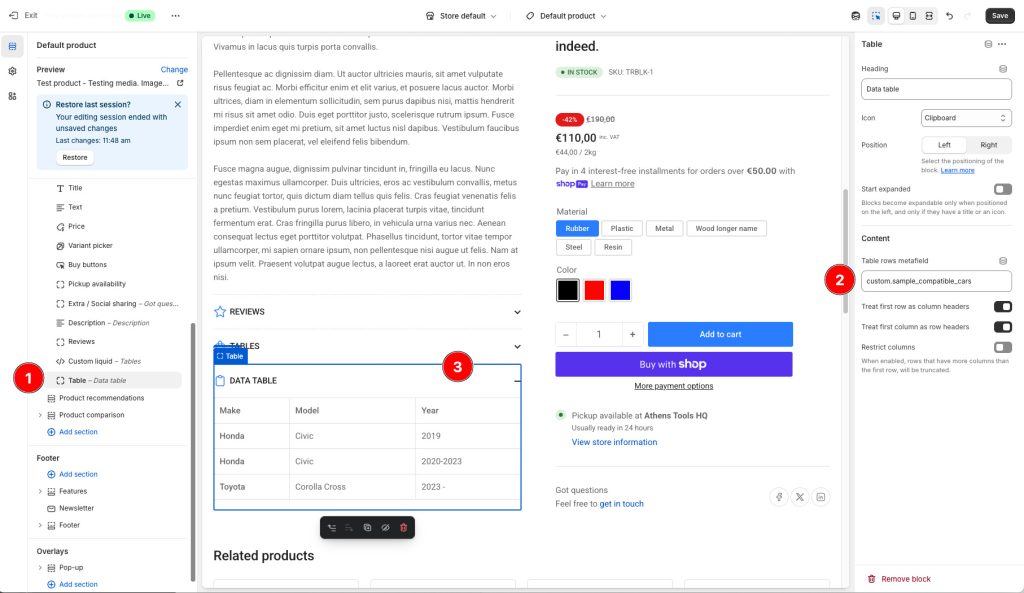
You should now see your product-specific table.
That’s it!
All you need to do now is add more metaobject entries (table rows), and select them on your products.
If you need larger groups of rows, you can add more (up to 100) by editing the metaobject definition and naming them as row_4, row_5, etc.
Happy table-ing!
Can't find what you are looking for? Feel free to submit a request.