Truly fine
Documentation.
Load custom fonts
Last update:
While Athens comes with its own rich set of typefaces to choose from, you might want to go the extra mile by adding your own, to make your store stand out.
In this guide, we’ll walk you through the steps on how to load custom fonts into the Athens theme via file upload and a bit of editing of the theme’s files.
Prerequisites
- Basic understanding of CSS.
- Access to your Shopify admin and theme editor.
- A custom font file (
.woff,.woff2,.ttf,.otf, etc).
Step 1: Upload your font file
Log in to your Shopify admin panel and go to Content > Files from the main menu on the left. Click on the button that’s labelled “Upload files” on the top right, and upload your custom font file. Note down its full name along with the file extension. For this example, we’ll use a font file named, TekoFontRegular.woff2 which we downloaded from a free font repository on the web.
Step 2: Include the font in the theme’s CSS.
It’s now time to edit the theme files. Navigate to Online Store > Themes and locate the Athens theme in the theme list (if it’s the active theme, it will be pinned at the top, otherwise it’ll be in the list below).
Click on the three-dots menu across the name of the theme and from the dropdown menu click “Edit code“. This will launch the theme editor. Search for the file “head-css.liquid“.
After you’ve opened the file locate the line that writes: {% style %} and directly below it paste the following code:
@font-face {
	font-family: "Teko";
	src: url("{{ "TekoFontRegular.woff2" | file_url }}") format("woff2");
	font-weight: 400;
	font-style: normal;
}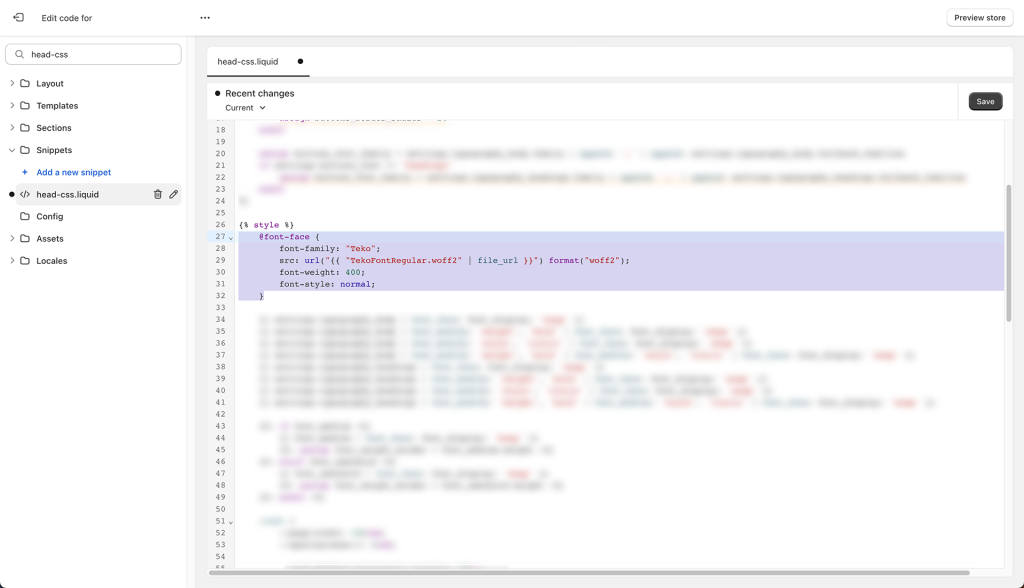
Make sure to replace the words in between the double quotes (the bolded words) with your own. The font-family property is how you will refer to this font wherever you want to use it.
The next two strings are the full filename of the font file you uploaded (including the extension) and the format of the font (this would be just the extension in most cases).
Step 3: Override the theme’s font-family with your custom font.
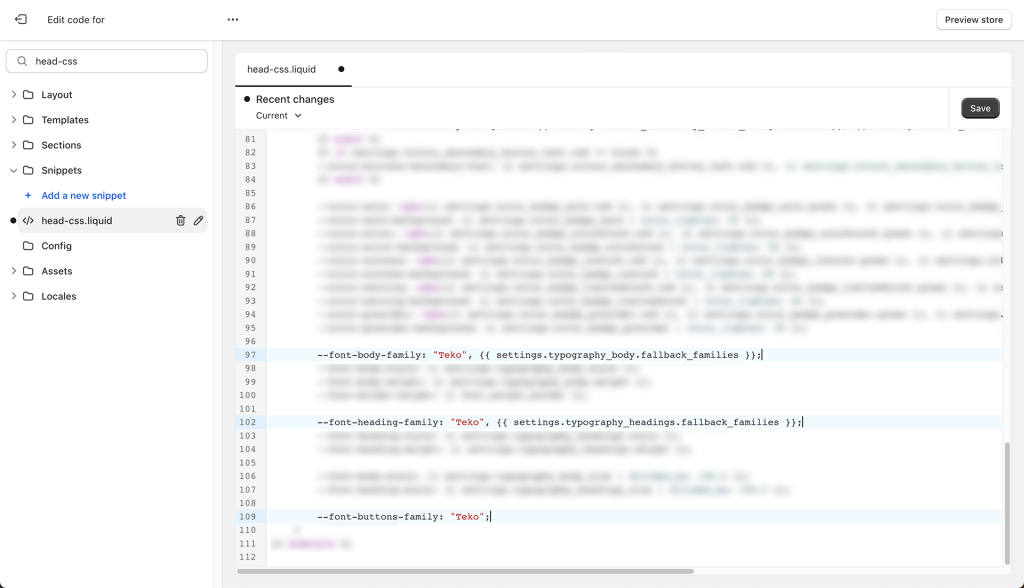
In the same file that you edited in the previous step, scroll a bit further down and locate the 3 following lines:
--font-body-family: {{ settings.typography_body.family }}, {{ settings.typography_body.fallback_families }};

...

--font-heading-family: {{ settings.typography_headings.family }}, {{ settings.typography_headings.fallback_families }};

...

--font-buttons-family: {{ buttons_font_family }};
and replace them with:
--font-body-family: "Teko", {{ settings.typography_body.fallback_families }};

...

--font-heading-family: "Teko", {{ settings.typography_headings.fallback_families }};

...

--font-buttons-family: "Teko";
i.e. replace the CSS variables with the name that you gave to the font-family property on the previous step.
Please note that you don’t have to replace all lines, if you want to change just the main content’s font you can simply replace the --font-body-family variable. If you want to change the headings’ font replace just the --font-heading-family variable, and the same applies to buttons, by editing just the --font-buttons-family variable.
Of course, you can mix and match by changing two out of the three main font variables (i.e. headings and buttons, or just body and buttons, etc), or you can also repeat the process with another custom font just for the headings or buttons, it’s up to you!
Step 4: Publish Your Changes.
Once you’re satisfied with your choices, save the file you’ve been editing and preview your theme. The new font should be adapted to your store.
Troubleshooting
- If your font is not displaying as expected, double-check your file paths and font names in the @font-face declaration.
- Ensure that you’ve uploaded correctly your custom font file and that you’ve entered correctly its full name including the extension in the @font-face declaration.
- Clear browser cache or use a private window to see the most recent changes.
Can't find what you are looking for? Feel free to submit a request.