Truly fine
Documentation.
Setting up and managing languages in your store
Last update:
This guide will walk you through the process of setting up and managing languages in your Shopify store using the Tokyo theme. Whether you’re manually translating content, localizing images and files, or even creating custom content for specific markets, this guide will provide step-by-step instructions to help you navigate the process with ease.
Step 1: Install Shopify’s Translate & Adapt app
For this guide we’ll be using the “Shopify Translate & Adapt” app to handle all translations and localization. You can use other third party translation management apps if you wish in a similar way, but since this app is developed by Shopify we’ll use it as the example for this guide.
To install the Translate & Adapt app:
- Navigate to the Translate & Adapt app’s page on the Shopify app directory.
- From the stores popup that appears, select the store that you want to install it on.
- Click on the button that says “Install”
- Follow the instructions on the screen and finalize the installation of the app.
Step 2: Create a language
Your store will already have a language created which is used as the default one (usually English). You’ll need to create additional languages via the Shopify admin:
- After you’ve made sure you’ve installed the Translate & Adapt app navigate to your store’s admin.
- Click on “Settings” on the main menu on the left.
- Scroll a bit further down and click on “Languages” on the main menu on the left on the settings screen.
- Click on the button that says “Add language”, select the first extra language you wish to create and click on the “Next” button.
- Select the Markets associated with this language, and click “Done”.
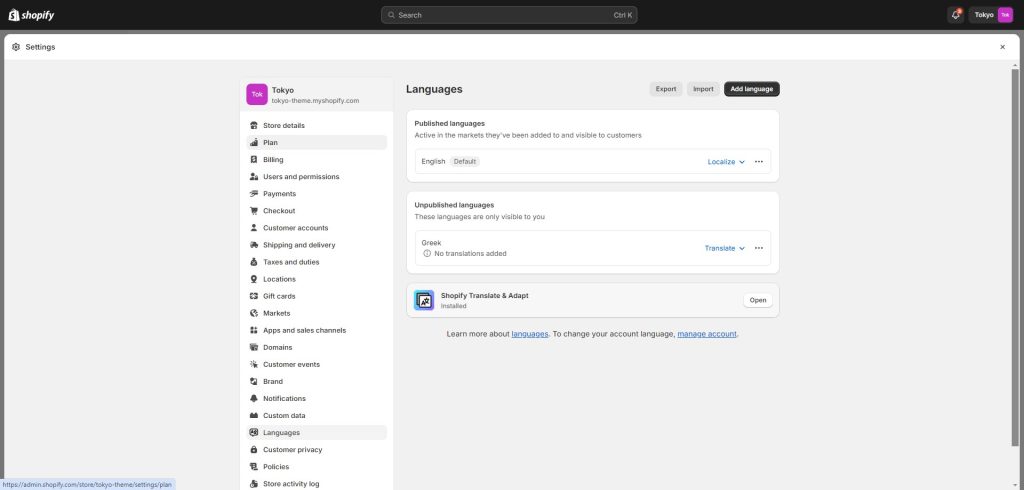
You should be seeing the following screen which includes your default language and the extra language you just created:

Similarly to the above, you can create as many languages as your store will need by repeating the process.
Step 3: Add translations for your content
While you’re still in the screen above after you’ve created your desired languages, click on the dropdown link that says “Translate” next to the language you want to start adding translations to:

Click on the Translate & Adapt option in the dropdown, which will take you to the app’s interface which should be showing a list of all the content types throughout your store in the selected language.
To begin translating content, click on one of the content types (e.g. “Products”), and then choose the item you want to translate first. For example in the screenshot below, we’ve chosen to start translating our products:
[TODO screenshot like the one below]

Note that Shopify’s “Translate & Adapt” app offers automatic translations for your content for a maximum of 2 languages. When you click Auto-translate on your content, empty and outdated content will be translated. This will not change any translations that you have added or edited manually.
Another way to access the translation app is from within the content. For example, when you navigate to a product’s edit screen in your store’s admin, clicking on “More actions > Localize” will navigate you to the product’s translation interface:
[TODO screenshot like the one below?]

Alternatively, you can provide translations via a CSV file. You need to export the translations CSV file in the Languages settings screen and then edit it with a spreadsheet program to fill in your translations. Then re-import it to apply the translations.
Step 4: Publish your languages
Note that while translating content, the languages remain unpublished by default. While unpublished, they are not visible on your storefront.
To publish a language after you’re done translating content, navigate to the Languages settings page and via the three dots menu of the language click on “Publish”:
[TODO screenshow like the one below]

Step 5: Enabling your languages on their respective markets
To make your languages available to your customers, you will need to activate them in the markets that you want them published. By default the languages you create will be enabled on the International Market (if it exists). Shopify prompts you to selects markets when creating the language, but in case you need to modify your selection, here is how to do it:
- Navigate to the “Markets” settings page in your store’s admin.
- Click on the market you wish to assign a language (i.e. Spain, International, etc), or create one (i.e. if you have a Spanish translation, you can create a market for the country of Spain).
- Click on “Languages and domain” under “Market Settings”
- Make sure that the languages you wish to assign to the particular market are activated.
If they’re not activated, click on the “Add languages” link, and select the language from the list of languages that appear under the “Not added to this market” heading.

Step 6: Enable the language switcher on your storefront

Tokyo fully supports multilingual stores and comes with a language selector (and a market selector) pre-enabled. Make sure that your language switcher is enabled and visible either on the footer or the “Top bar” section. Navigate to your store’s customizer, click on the Footer section, and scroll until you see the Language selector header. Make sure that the language selector is enabled.
Alternatively, you can enable the Language selector on your header by adding the “Top bar” section on your header area, and making sure the Language selector is enabled.
And that should be it! You’ve successfully navigated through the process of setting up and managing languages in your Shopify store using the Tokyo theme. By now, you should have a multilingual store that caters to a diverse range of customers from different linguistic backgrounds.
Can't find what you are looking for? Feel free to submit a request.