Truly fine
Documentation.
Setting up sibling products
Last update:
This feature was introduced in version 4.2.0
Sometimes you have separate products that you need to display as if they were variants of the same product. This is usually the case when you split a product based on some product option (e.g. color) because you want them listed separately in your listing pages. Yet, you need to link to other colors from within the product template, as if they were variants.
This is where the Sibling products blocks comes in.
The solution is based on a metaobject that allows you to define groups of products, and a product-bound metafield so that each product knows who its siblings are.
Set up the metaobject
To create the metaobject definition, first go to Settings > Metafields and metaobjects, scroll down to the Metaobject definitions section and click on the Add definition button.
On the Name field, type a descriptive name, such as “Sibling products“. We will refer back to it when we set up the product metafield.
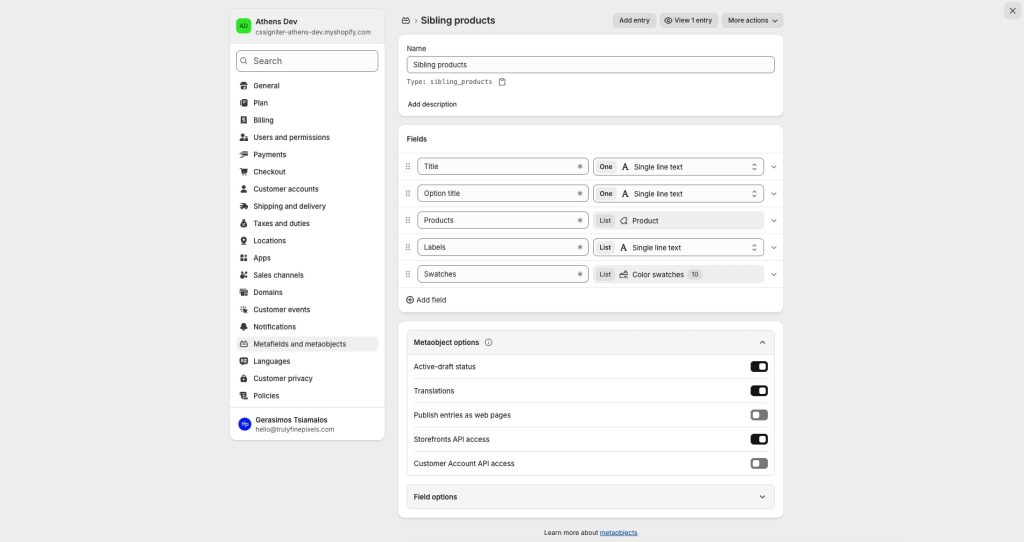
Add the title field
The first field will be for your own reference. On the first row of the Fields section, click on the Field label field end type a descriptive name, such as “Title“. Make sure One is displayed in the sub-dropdown, and then click on the Select field type dropdown and select Single line text.
Add the option title field
Click on the Add field link, and in the new row type a descriptive name, such as “Option title“. This will hold the label (e.g. “Color”) that will be displayed on top of the siblings picker, just like with standard product options/variants. Again, make sure One is displayed in the sub-dropdown, and then click on the Select field type dropdown and select Single line text. Expand the row by clicking on the arrow on the right, and make sure the key is option_title. This is required.
Add the products field
Click on the Add field link once more. Type Products in the Field label, but this time click on the One dropdown and select List of values. Finally, click on the Select field type dropdown and select Product. Expand the row by clicking on the arrow on the right, and make sure the key is products. This is required.
Add the labels field
Click on the Add field link again, and this time type “Labels“. Select List of values and Single line text respectively. Make sure the key is labels. This is required.
Add the swatches field
Lastly, click on the Add field link again, and this time type “Swatches“. Select List of values and then Metaobject. On the list of metaobject definitions, select a “swatches” metaobject, that is a metaobject that contains at least a color and an image keys.
If you have your store quite some time, you may have created such a metaobject yourself in the past using some name of your choice. If you didn’t, or your store is new, Shopify created one for you called Colors, so select this one.
As always, make sure the key is swatches. This is required.
Once you have all fields set up, press Save on the top of the page to save the metaobject definition.
Set up the product metafield
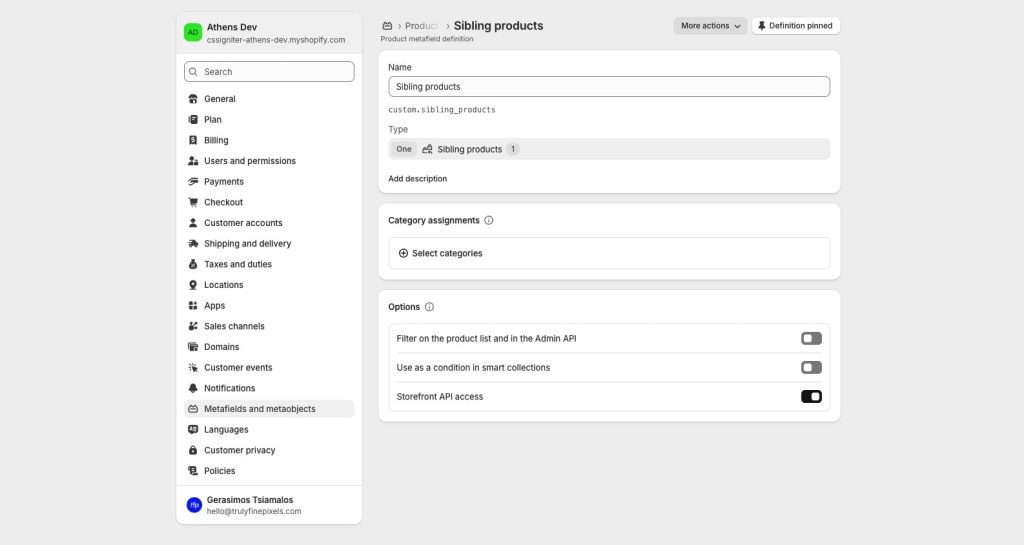
To create the product metafield, go to Settings > Metafields and metaobjects, and on the Metafield definitions section click on Products. Then, click on the Add definition button.
On the Name field, type “Sibling products“. Make sure the namespace and key are “custom.sibling_products“.
Make sure One is selected, and then click on the Select type dropdown. Select Metaobject, and from the list of metaobject definitions that appears, select the Sibling products metaobject you just created.
Finally, press Save to persist the metafield.
Associate sibling products
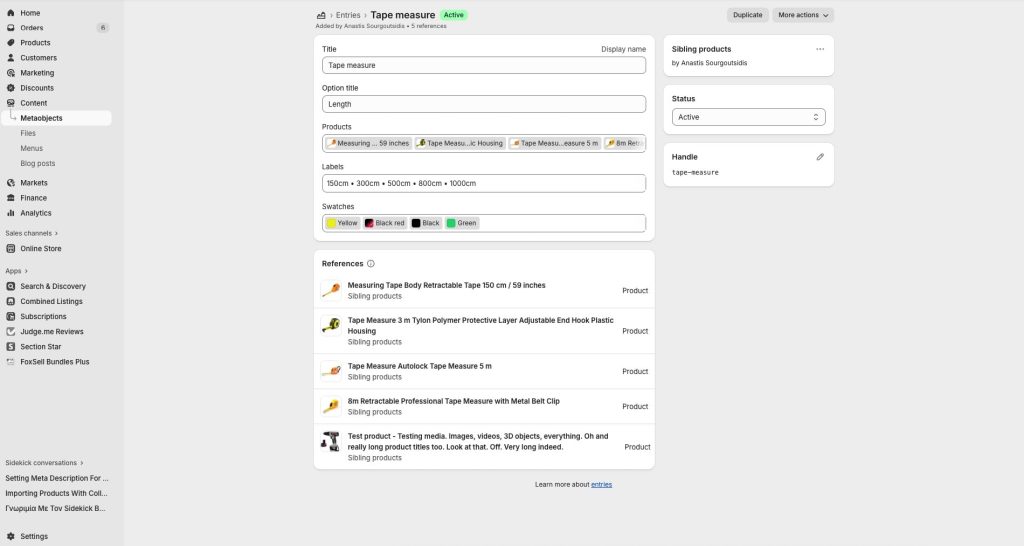
Assuming you have some products you want to associate, let’s add some sibling products! Go to Content > Metaobjects > Sibling products > Add entry.
For the purposes of this example, let’s assume you have the products “Example product red”, “Example product green”, and “Example product blue”.
For the title write something that describes all products, like “Example product“. In the Option title field, type something like Color, as this is the logical property that makes this products siblings.
Click on products, and select your three products. Once selected, you can rearrange them by dragging the dotted icons on the left.
The Labels field is optional. Products will use their titles in the siblings picker, but you might want to use this field to give them shorter names, e.g. “Blue” instead of “Example product blue”. The first product will use the first title, the second product will use the second title, etc.
Finally, the Swatches field is also optional. Products will use their main photos in the siblings picker, but you might want to use this field to display a simpler image or color instead. The first product will use the first swatch, the second product will use the second swatch, etc.
Assign siblings entry to products
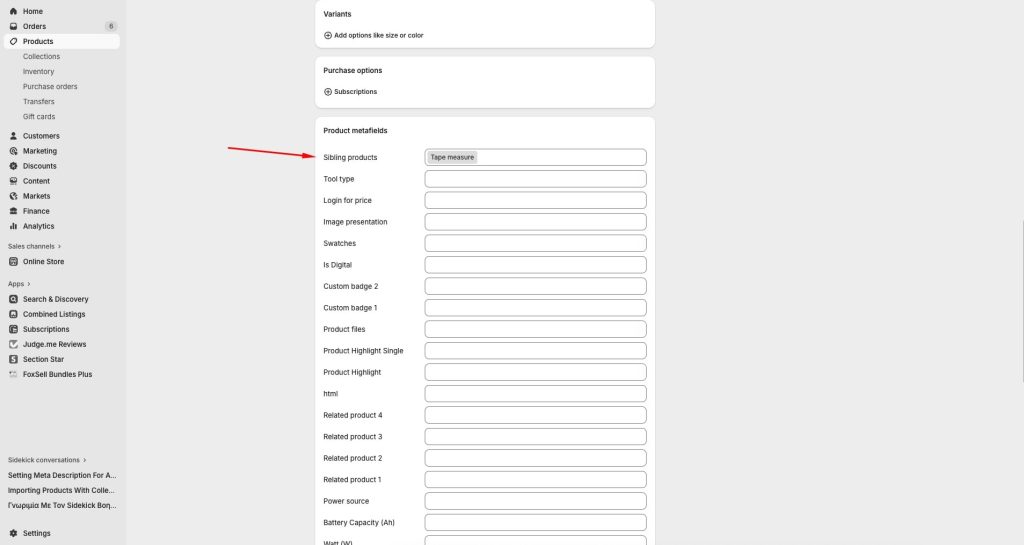
Now we need to make products aware of their siblings. To do that, we need to select the metaobject entry we just created, in each sibling product.
Edit “Example product red”, scroll down to the Product metafields section, click on Sibling products, and select Example product (the title that you gave in the previous step). Save your changes. Now repeat the same thing on the green and blue products.
Display siblings
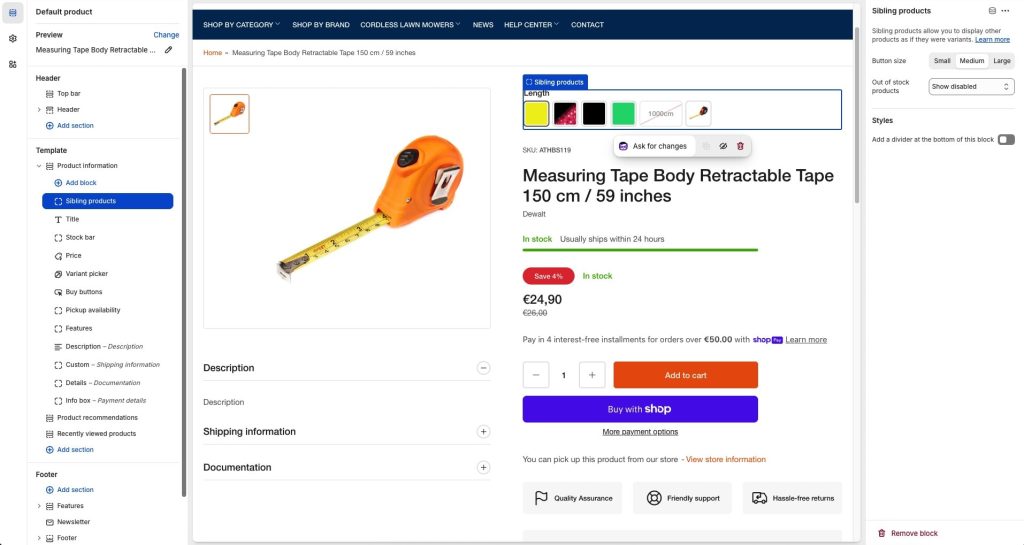
We are ready to display our siblings. Go to the theme customization page (Sales channels > Online Store > Themes > Customize) and customize the default Product template. Add the Sibling products block. Make sure you are previewing one of the sibling products.
You should now see your product’s siblings!
Can't find what you are looking for? Feel free to submit a request.